One of the first things I checked when we were looking at buying our new house was the wiring. It was built in 1940 and had been sitting empty for almost 10 years because the original owner had moved to Florida because of her declining health. It went on the market about 4 years ago, and remained there, probably because nobody wanted to tackle all of it's issues. I love old houses because they are usually well built and established, and I can see the potential in them. When I was inspecting it before we bought it, I found that it had good "bones", and the plumbing looked like it had been redone at one time, but the electrical wiring looked iffy. I have done quite a bit of electrical work before, including replacing a service panel, so I didn't let that keep us from purchasing it.
The first thing we did was have a new service wire run in from the power pole by the local power authority. The squirrels had been busy chewing on it and it needed to be moved over to a different location on the house to replace the old 100 amp meter box with a new 200 amp meter box.
 |
Original service wire location and 100 amp box
|
 |
New service wire installed and relocated by power company
|
At this point I hired a professional electrician to install the new 200 amp meter box I purchased at Lowes. I knew my capabilities, and did not want to fry myself like a piece of bacon just to save money. They charged me $400 to install the box, run the conduit, and make the connection to the new service wire. You know it's dangerous when the electrician's every move is slow and deliberate.
 |
| New 200 amp box |
Now on to the inside. I knew I was going to need to rewire the house almost immediately. The first time I tried replacing a light fixture, the old wire insulation just crumbled in my hand. I decide at that point to make VERY sure my homeowners insurance was current and rewiring the house was priority number one. I called my buddy Frank from Florida, and he came up for a week to help me tackle this job. The picture below is of some spare wire in the basement. It looked like asphalt impregnated cloth.
 |
| Old house wire |
Here is what we started with. It had the old screw in fuses with (16) 110 volt circuits, (2) 220 volt circuits, and the 100 amp main breaker was a pull out type that was broken in half. Off to the side was a small 4 circuit sub panel that also had screw in fuses. The inside of the box had been rusting from an old roof leak that had run down the wall into it and some of the old wires had melted insulation near the ends where they had been overloaded. I installed the new gray box (below) which served as a substitute for the main breaker which I couldn't safely remove in case of an emergency. Before Frank arrived I started running new wires (white ones) and made temporary connections.
 |
| Scary huh? |
 |
| See the gray box? |
The orange and large black wire were new ones I ran for the stove and dryer.
 |
Old electrical panel (note the missing stairs to basement)
|
Here are the new stairs. The old ones were completely gone, I guess they had rotted away years ago.

Once Frank arrived we started rewiring. We pretty much wasted an entire day trying to make sense of the way it was previously wired, and both agreed we shouldn't have even tried. We ran over 1000 feet of 12/2 wire in the basement, 1st and 2nd floors, and attic. Every receptacle outlet and light switch was replaced along with new boxes as needed. We added outlets, moved some, and put most every room on their own circuit. I hate to have to work on one room and have to shut off the electricity to half the house to do it. Fortunately for us we had great access to run the wires in the basement and attic and any holes we had to make in the walls were small and easily patched. Once all that was done we ran several hundred feet of new 10/2 wire to the two old style floor heaters and three 220 volt outlets. Two invaluable tools you need are a
fish rod and a
fish tape . These will make your life so much easier and you won't have to rip down the walls to run your wires. The other thing to have is a Sharpie! Write on the ends of the wires what room they go to so you can easily identify which circuit to add them to in the breaker box.
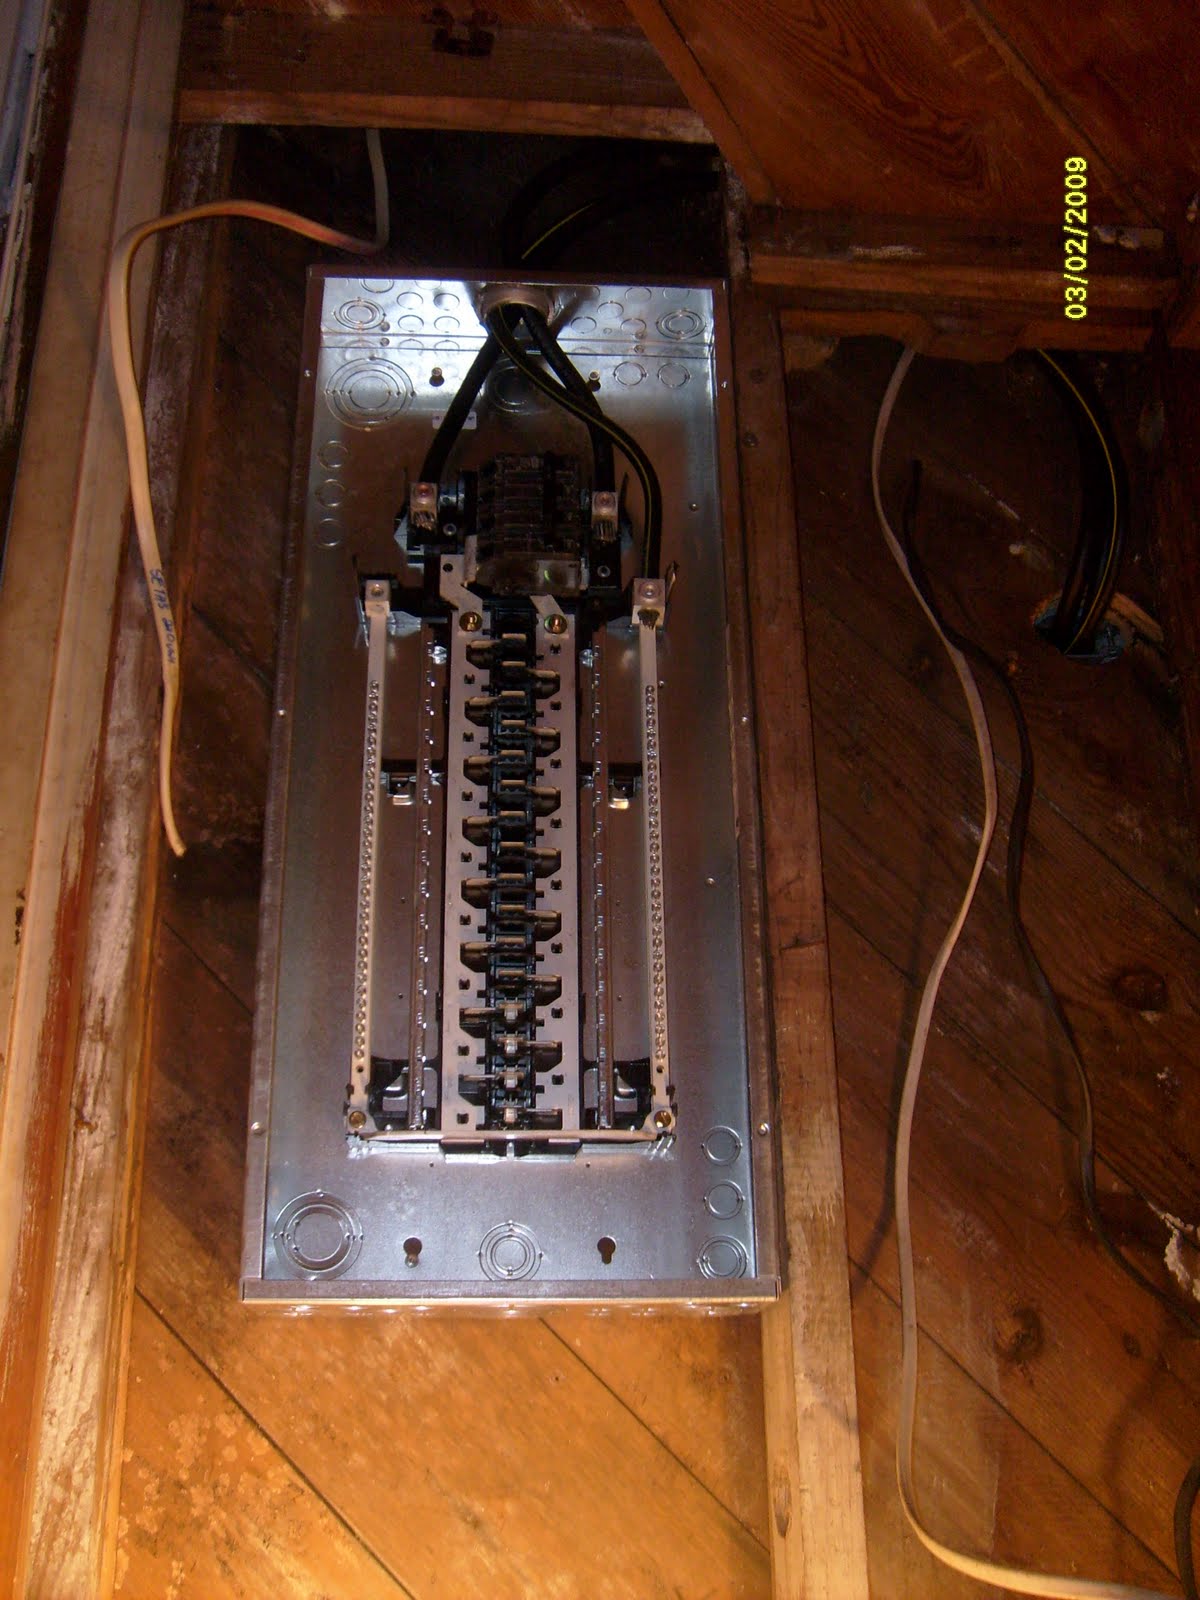
After all the wires were run we removed the old boxes and mounted the new
load center . Due to the cramped quarters around the new breaker box, I went down the stairs to the basement and routed the wires up to Frank, so he could make all the connections.
 |
Much safer and neater plus double the circuits.
|
We found these wire
clips at The Home Depot. They really make it neat.
 |
Red wire clips
|
When all was said and done, we powered it up and everything worked! Woohoo! Really though, it wasn't as hard as you might think, plus it saved me about $10,000 dollars. We had estimates that ranged from $9000 to $12,000 dollars. Those estimates did NOT include repairing all the drywall that they would have torn down. Like I said before Frank and I made small holes where we absolutely had to, and they were easily patched. We are now safe and up to date. On a side note, Frank made the trip up here on his dime. He wouldn't accept a thing from us, but we did manage to sneak a new gas grill into the bed of his truck and feed him well while he was here. He's one of a rare breed of friends and I'm glad to have him as my best one. Thanks buddy!


It's really important to know how many volts you'll be using for your house. That's why a professional electrician is a must have for this kind of matter. They'll know how much amperes you'll be needing for a specific location in your house. Also for each equipment that you have since each appliance has its own capacity.
ReplyDelete